User Manual - 3.1
- Mona (Unlicensed)
- Admir Dzanic
![]()
EDMtruePLM ™
True Product Lifecycle Management
Web Client User Manual for Version 3.1
Role | Name | Date |
Written by | Mona Chaure & Alexey Zorin | 29.04.2021 |
Verified by | Jochen Haenisch | 29.04.2021 |
Approved by | Kjell Bengtsson | 29.04.2021 |

Document revision history
Rev. | Description | Status | Date | Authors |
1.0 | Updated | Final | 23.06.2020 | Jotne |
1.1 | Updated | Final | 29.04.2021 | Jotne |
Proprietary notice: Information in this publication is subject to change without notice. The software described in this publication is furnished under license agreement or non-disclosure agreement. The software may be used only in accordance with the terms of those agreements. No part of this publication may be distributed to third parties, copied, duplicated, in any form, whole or in part, without the prior written permission of Jotne EPM Technology AS, Grenseveien 107, N-0607 Oslo, Norway.
Express Data Manager™, EDMserver™, EDMapplicationServer™ and EDMtruePLM ™ are registered trademarks of Jotne EPM Technology in Norway. Please contact helpdesk@jotne.com for details.
Note to the reader of this document
The reader of this document should be accustomed to engineering projects and to the use of web-browsers for engineering applications. Good understanding of the principles of product data management (PDM), product lifecycle management (PLM) and document management is recommended. Working knowledge of CAD, CAE (FEA, CFD), Logistics, and ERP solutions is an advantage, but not a necessity to benefit from using EDMtruePLM with the help of this user manual. This document uses artificial test data that represent a bike product model. 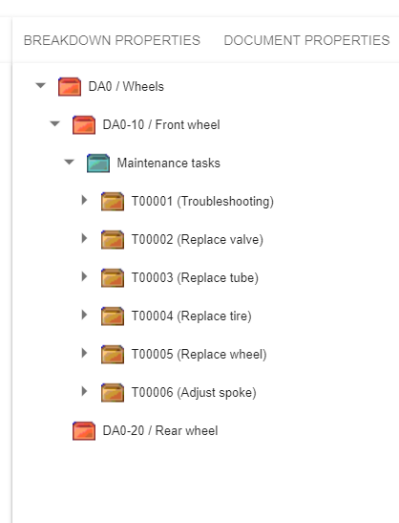
Figure 1. A bike example is used throughout this User Manual
Table of Contents
1 Introduction
1.1 Purpose of this document
1.2 Scope of EDMtruePLM
1.3 Contents of this document
2 Login to the EDMtruePLM
3 EDMtruePLM Product Management GUI
3.1 Overall Client View
3.1.1 Closing tabs
3.2 Administration menu
3.2.1 Projects
3.2.2 Breakdown templates
3.2.3 Project templates
3.2.4 Administration
3.2.4.1 Create project
3.2.4.2 Create project from PDM file
3.2.4.3 Create project from text
3.2.4.4 Create project from baseline
3.2.4.5 Create project from ASD DEX1
3.2.4.6 Change user password
3.2.5 About
3.2.6 Log Out
3.3 Breadcrumb menu
3.4 Breakdown Structure
3.4.1 Notification of changes by other clients
3.4.2 Breakdown element functionality
3.4.2.1 Breakdown versioning
3.4.2.2 Child node functionalities
3.4.2.2.1 Rename element
3.4.2.2.2 Rename by attribute
3.4.2.2.3 Edit element
3.4.2.2.4 Delete element
3.4.2.2.5 Cut element
3.4.2.2.6 Copy element
3.4.2.3 Parent node functionalities
3.4.2.3.1 Create element
3.4.2.3.2 Paste element
3.4.2.3.3 Paste element as relating
3.4.2.3.4 Paste element as related
3.4.2.3.5 Add Organisation
3.4.2.3.6 Put Product
3.4.2.3.7 Generate document
3.4.2.3.8 Add data file
3.4.2.3.9 Paste data file
3.4.2.3.10 Show element in context
3.4.2.3.11 Show BOM
3.4.2.3.12 View Change log
3.4.2.3.13 Create baseline
3.4.2.3.14 Subdomain info
3.4.2.3.15 Subdomain management
3.4.2.3.16 Import from STEP PDM file
3.4.2.3.17 Import from AP242 BO model
3.4.2.3.18 Import from Req-IF file
3.4.2.3.19 Export to zipped folder
3.4.3 Data file functionalities
3.4.3.1 Checkout file
3.4.3.2 Undo checkout
3.4.3.3 Checkin file
3.4.3.4 Set file read only / Clear file read only
3.4.3.5 Download
3.4.3.6 Open
3.4.3.7 View history
3.4.3.8 Delete
3.4.3.9 Copy file
3.4.3.10 Cut file
3.4.3.11 Paste file as affected
3.4.3.12 Paste file as affecting
3.4.3.13 Sticky notes
3.4.3.14 Dependencies
3.4.4 Icons used for breakdown elements and data files
3.4.5 Navigation
3.5 Property window
3.5.1 System properties of breakdown elements
3.5.2 System properties of data files
3.5.3 Product properties
3.6 Project menu
3.6.1 Make comparison
3.6.2 Baselines
3.6.3 Search
3.6.3.1 Breakdown element
3.6.3.2 Data files
3.6.3.3 Search result tabs
3.6.3.4 Sorting the search results
3.6.4 Catalogues
3.6.4.1 Product
3.6.4.2 Organisation
3.6.5 Reference data definitions
3.6.5.1 Opening the RDL page
3.6.5.2 Reference data GUI
3.6.5.3 Adding reference data
3.6.5.4 Deleting reference data
3.6.5.5 Adding document property
3.6.5.6 Adding breakdown element type
3.6.5.7 Adding breakdown element property
3.6.5.8 Adding derived property
3.6.5.9 Adding an aggregate structure
3.6.5.10 Adding a filter key to aggregate data
3.6.6 Language selector
3.7 Project root context menus
3.7.1 Project root menu
3.7.1.1 Rename element
3.7.1.2 Rename by attribute
3.7.1.3 Edit element
3.7.1.4 Versions
3.7.1.5 Export to STEP PDM-file
3.7.1.6 Export structure to text file
3.7.1.7 Export project to DEX
3.7.1.8 Import CSV file
3.7.1.9 Current project phase
3.7.2 Project root selected menu
3.7.2.1 Create element
3.7.2.2 Paste element
3.7.2.3 Show element in context
3.7.2.4 Show BOM
3.7.2.5 View change log
3.7.2.6 Create baseline
4 EDMtruePLM Administration GUI
4.1 Projects Administration
4.1.1 Add user
4.1.2 Edit user
4.1.3 Remove user
4.1.4 Populate new project by import
4.1.5 Download STEP pack
4.1.6 Upload STEP pack
4.2 Breakdown template list
4.3 Project template list
4.4 User list
4.4.1 Create user
4.4.2 Deleting user
4.4.3 Editing user
4.4.4 Changing user password
4.5 Project list
4.5.1 Add project
4.5.2 Deactivate project
4.5.3 Reactivate project
4.5.4 Delete project
4.6 About
4.7 Log out
5 Annex Guide – Text file structure
6 Reference Material
Figures
Figure 1. A bike example is used throughout this User Manual
Figure 2. Login Window
Figure 3. Navigation Page
Figure 4. Closing tabs
Figure 5. Administration menu – ordinary user
Figure 6. Active Project
Figure 7. Breakdown template
Figure 8. Project template
Figure 9. Administration tab
Figure 10. Create new project with active user login
Figure 11. Project from PDM file
Figure 12. Project from text file
Figure 13. Project from zipped baseline
Figure 14. Project from DEX
Figure 15. Change user password
Figure 16. About current user and project details
Figure 17. Breadcrumb menu
Figure 18. Breakdown Structure
Figure 19. Change notification
Figure 20. Breakdown structure versions
Figure 21. Child node context menu
Figure 22. Rename element
Figure 23. Rename by attribute
Figure 24. Edit element
Figure 25. Delete element
Figure 26. Two copies in the same parent
Figure 27. Parent node context
Figure 28. Parent node context menu
Figure 29. Create element
Figure 30. Requirement element
Figure 31. Requirement node menu
Figure 32. Requirement types
Figure 33. Establishing a backward/related relationship
Figure 34. Establishing a direct/relating relationship
Figure 35. Add organization to a breakdown element
Figure 36. Organisation system property with details
Figure 37. Product details
Figure 38. Add data file
Figure 39. Show element in context
Figure 40. Show BOM
Figure 41. Breakdown element change log
Figure 42. Create baseline
Figure 43. Subdomain info
Figure 44. Subdomain management
Figure 45. Subdomain options
Figure 46. Create subdomain
Figure 47. Delete subdomain
Figure 48. Subdomain roles
Figure 49. Subdomain members
Figure 50. Add subdomain members
Figure 51. Subdomain members details
Figure 52. Import from STEP PDM
Figure 53. Import from AP242 BO model
Figure 54. Import AP242 BO model example
Figure 55. Import from Req-IF
Figure 56. Data file menu
Figure 57. Checkout of a file
Figure 58. Checkin of a file
Figure 59. Read only file
Figure 60. View History
Figure 61. Sticky Notes
Figure 62. Create new note
Figure 63. Sticky note form
Figure 64. Dependencies
Figure 65. Red Flag
Figure 66. Removed red flags
Figure 67. Dependencies tab menu
Figure 68. Property window
Figure 69. Project Menu
Figure 70. Version and baseline comparison tab
Figure 71. Version comparison window
Figure 72. Baseline tab
Figure 73. Search tab
Figure 74. Quick Search
Figure 75. Node search
Figure 76. Document search 1
Figure 77. Document search 2
Figure 78. Document search result
Figure 79. Node search result
Figure 80. Sorting search result
Figure 81. Catalogues
Figure 82. Product menu
Figure 83- Organisation menu
Figure 84. Reference data
Figure 85. Add reference data
Figure 86. Delete reference data
Figure 87. Add document property
Figure 88. Add breakdown element subtype
Figure 89. Add breakdown element type
Figure 90. Add property for specific breakdown element type
Figure 91. Breakdown property input form
Figure 92. Create new breakdown element property
Figure 93. Create derived property
Figure 94. Derived property example
Figure 95. Aggregate structure
Figure 96. Create new aggregate property type
Figure 97. Aggregate type
Figure 98. GUI language selection
Figure 99. Initial project root context menu
Figure 100. Export to DEX input form
Figure 101. Example of an import file in csv-format
Figure 102. Bike structure after csv import
Figure 103. Project root context menu after selection
Figure 104. User Interface
Figure 105. Project Administration
Figure 106. Add User
Figure 107. Edit User
Figure 108. Delete User
Figure 109. Import data
Figure 110. Breakdown Template
Figure 111. Create breakdown template type
Figure 112. Project Template
Figure 113. Create project template type
Figure 114. User list
Figure 115. Create User
Figure 116. Delete user
Figure 117. Edit user
Figure 118. Change Password
Figure 119. Project list
Figure 120. Create project
Figure 121. Deactivate project
Figure 122. Activate project
Figure 123. Delete project
Figure 124. About
Tables
Table 1. Icons for breakdown elements and data files
Table 2. Breakdown element system properties
Table 3. Data file system properties
Table 4. Product properties
Table 5. Document property types
Table 6. Breakdown element property types
Table 7. Aggregate property types
Table 8. List of User Types